With Christmas just around the corner, you may be wondering what toys are best to support your child's development and encourage cognitive growth, language development, creativity and imagination. Here are a few ideas for choosing Christmas presents that will facilitate healthy development through play.
1. Blocks
Blocks are a great toy at every age. You can purchase blocks made from cloth, foam, wood, cardboard and plastic. Blocks teach children about cause-and-effect, ie. "When I hit the tower of blocks, it falls over!" Blocks encourage creativity as children explore new ways of building and add to their block play by using toy cars, animals and people.
2. Books
Did you know children who come from homes where books abound grow up to be children who love reading? (See Jim Trelease's Website) Adding to your child's personal library is a Christmas gift that will support their learning now and in the future. Choose age-appropriate books and books that your child shows a high interest in. See THIS post for some great book recommendations.
3. Music
Encourage your child's love of music by providing him or her with child-sized instruments and CD's filled with favorite childen's songs. The love of music seems to be inate in young children. Age-appropriate music encourages brain and language development as children learn rythm and rhym through their favorite children's songs.
4. Puzzles
Puzzles teach problem-solving skills and help children feel competent as they accomplish difficult tasks. Make sure that you purchase age-appropriate puzzles. Babies and toddlers fare best with chunky, wooden puzzles. Preschoolers may enjoy more advanced wooden puzzles and large floor puzzles. You can spend time with your older children creating puzzles with larger numbers of pieces and more intricate designs.
5. Dress-Up Items
If your child doesn't already have a stash of dress-up clothes, Christmas is a great time to start a collection. You can decorate a toy box and fill it with some of your old clothing or purchase new or used costumes and other dress-up items such as hats and shoes. Dressing up encourages "dramatic play" where children recreate familiar scenes, such as when they play "house" or "school." Children also use dramatic play to exercise their imaginations as they take on new roles and plan out the plot of their game.
The most simple way to store homemade baby food is by freezing it in ice cube trays. After pureeing your baby's favorite meals, store a few servings in containers you can place in the fridge and pour the remaining puree in ice cube trays to preserve for later. You can then remove just a few cubes at a time according to your baby's serving needs. Thaw the cubes in a small saucepan and make sure that they are not too hot before serving them to your baby.
With Christmas just around the corner, you may be considering what to purchase for the children in your life. Books make wonderful gifts and you can even write an inscription or tape a picture of yourself on the inside cover. With so many children's books on the market, it can be hard to know which books are worth your money. The New York City Public Library has compiled a list of 100 exceptional picture books. Whether you purchase these new or second-hand or borrow them from the library, try to share these books with your little ones.
- enough red paper to be able to cut out 8 squares that are each about 4 1/4 inches wide and 5 1/2 inches tall
-scissors
-glue
-black and white images, some great ones can be found here.
1. Cut a piece of white poster board into horizontal strips. Each strip will create one vision board and should be about 7 inches wide.
2. Divide your strip of poster board into four equal sections, folding the board on each division accordion style (fold towards the back, then towards the front, then towards the back again). If your strip is about 22 inches long, your divisions should be around 5 1/2 inches apart from one another.
3. Cut 8 squares out of red paper for each board. The squares should measure to be about 4 1/4 inches wide and 5 1/2 inches tall. Glue the squares on the front and back of the board in each of the sections that you created in step #2.
4. Cut out some black and white pictures to glue on the red squares. Babies especially love pictures of faces. Some great pictures can be found at this website.
5. Laminate the board, if you can.
You did it! Now enjoy spending some time with your baby enhancing their vision development!
If you're looking for a fun and easy craft to do with your children this Thanksgiving, try making these turkeys out of apples.
You will need: red apples, gum drops (big or small), whole cloves, orange candies and toothpicks.
Make the feathers by placing the gum drops onto the toothpicks and then insert them into the back of the apple. For the head, take two cloves and insert them into the side of the orange candy. Then cut a red gum drop into fourths and use 2 of the pieces to make a waddle. Use a tooth pick to stick the head into the front of the apple. Now you have a turkey!
If your little one is already eating solids, why not include him in your family festivities by creating a holiday meal with his taste buds and development in mind. Wholesomebabyfood.com has a wonderful list of developmentally appropriate recipes that you can make using the foods the rest of your family will be eating.
- A simple and quick recipe making use of the Thanksgiving foods.
Leave out Meat and Cranberries for babies 6-8 months.
Ingredients:
1 cup of Turkey - uncooked ( breast or leg meat)
1/2 cup peeled and cubed winter squash
1/2 cup peeled and cubed white potato
1/2 cup peeled and cubed sweet potato
1 small handful of fresh or frozen cranberries
Directions:
Combine all ingredients in a medium sized sauce pan
Add 2 cups of water
Bring to a gentle boil and then turn heat to low
Simmer on low for 20 minutes or until turkey is no longer pink and veggies may be easily pierced with a fork.
Transfer the cooked One Pot Thanksgiving Dinner to a large mixing bowl and mash or chop as needed.
Process in a Blender or Food Processor if needed for babies who do not like lumps and textures.
This will freeze nicely if pureed on Thanksgiving Day, you may also take a piece of cooked turkey and combine it with the veggies being served to create Baby's Thanksgiving Dinner.
Are you itching to get out of the house and take your little ones somewhere fun? Here are a few FREE ideas in Provo.
1. The Provo Towne Center Mall recently opened a new Play Area for children! You can get some excercise by strolling around the mall and then watch your little ones as they climb and explore. http://www.provotownecentre.com/
2. Bean Life Science Museum at BYU. Entrance is free but donations are appreciated.
5. Provo Borders Special Events
Check out special events for children offered at Borders in Provo by clicking on this link and scrolling to the bottom of the page.
Looking for more free activities in UTAH COUNTY? Click HERE
Long before your baby says her first word, she is communicating with you in a number of important ways. Your baby uses cries, coos and body language using her face, arms, legs, hands, feet and even toes to tell you what she is feeling or in need of. The Secret Language of Babies, by Sally and Edwin Kiester, outlines what your baby is trying to tell you through these important cues.
Some of the highlights of the book are:
~ How to Interpret Your Baby's Cries - This section describes 10 cries, what they sound like, what your baby is trying to tell you and how you can help meet your baby's needs. (p. 47-51) ~ A Guide to Understanding Baby's Facial Expressions - This section explains 8 common facial expressions babies make and what they are trying to say. (p. 57-61) ~ Explanations on what your baby is trying to tell you with his arms, hands, legs and feet.
Interesting Facts: Did you know that when your baby moves his arms in a windmilling motion and his facial expressions are happy, he is showing you that he is excited about seeing you or about what is going to happen next? (p. 69)
Interesting Facts: Did you know that your baby extending her big toe is a likely sign that she is in pain? Also, the whole foot being pointed toward the floor may evidence acute pain. Finally, your baby may express discomfort by slightly curled toes. (p. 79)
Find more interesting facts by reading this insightful book, full of helpful hints, relevant research and beautiful pictures.
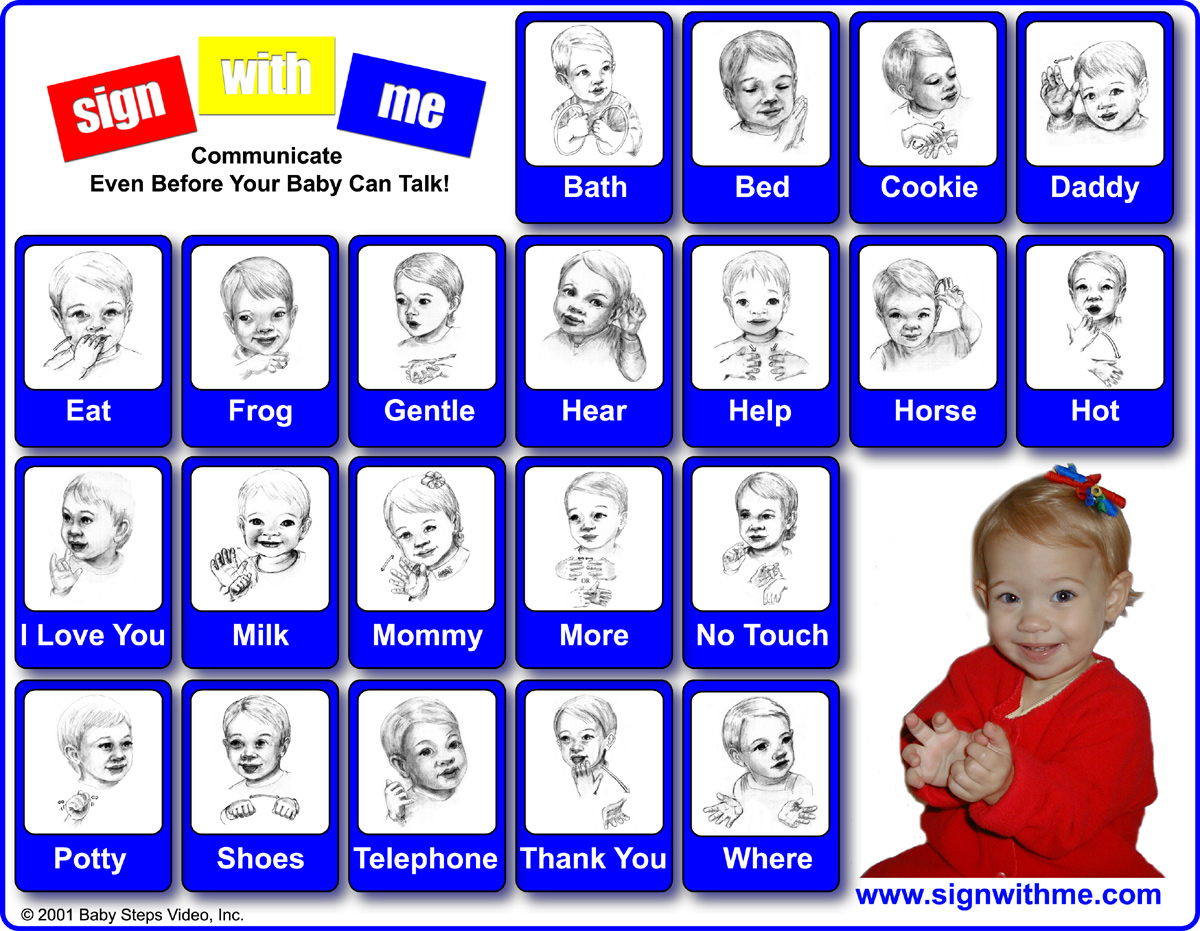
As a new mother myself, I have heard a lot about introducing basic signs to infants to encourage communication. I have read the pros and cons (yes, there are pros and cons to just about every parenting topic, even sign language for hearing infants) and decided that I want to introduce simple signs to my baby for the following reasons:
1. Babies develop the ability to physically manipulate their hands and arms before they can move the small muscles of the mouth and tongue to articulate words.
2. Baby girls usually speak before baby boys, but babies learn to sign at the same rate despite gender. I have a baby boy and I would like him to be able to express his needs as early as possible.
3. Being able to sign a need helps babies reduce their frustration at not being able to express needs.
YOU DO NOT NEED TO SPEND MONEY TO USE BABY SIGN! Basics such as diapers and wipes are expensive enough, don't make this one more thing you feel compelled to spend money on. There are countless books, DVDs and classes promising to teach you and your baby to sign. Why not access the FREE resources available and learn to sign with your baby without draining your bank account.
FREE BABY SIGN RESOURCES and IDEAS:
-Try your public library for resources on signing with children or American Sing Language. Most public libraries have fun DVD's such as Signing Time, that you can use for free!
-Make your own signing book. Take a picture of an item you want to teach a sign for such as "milk" or "cup." Then take a picture of you or another person performing the sign for the item. Print the pictures and place them side by side in a small photo album. Share this album with your baby and practice the signs together.
If you have young children, you probably have a box of broken crayons somewhere in your house. Instead of throwing them out, turn them into fun, chunky crayons. Your child will enjoy helping make these and they will love coloring with their homemade creations!
SUPPLIES: Old Crayons, Muffin Tins, Muffin Liners (if desired).
1. Preheat oven to 150 degrees Fahrenheit.
2. Remove the paper from each crayon and place the crayon pieces in a muffin tin.
3. Place the muffin tins in the oven and bake for 15-20 minutes, or until the wax is melted.
4. Allow the wax to cool. When the crayons have cooled, pop them out of the muffin tin.
5. Provide your child with paper and enjoy their artwork!
The first 5 to 6 months of your baby's life are full of changes as your baby grows from a sleepy, fragile newborn to an active, alert baby. As your baby has spent time on his tummy every day, known as Tummy Time, he has been strengthening his arms, neck, back and stomach muscles. (Read more about Tummy TIme HERE). Your baby most likely rolls from front to back and back to front, which also takes lots of muscle strength and control. The next milestone is sitting alone. In order to be able to sit alone, your baby must first learn to sit with support.
Here are some ways that you can help your baby learn to sit alone:
-If you have a nursing pillow or upright infant seat such as a Bumbo or high chair, place your child in her chair and provide some toys, read a few books or play games like "Peek-a-boo" and "Pat-a-cake" while your little one practices sitting.
-Don't run out and buy one of the above mentioned items if you do not already have one around your house. Instead, use a square or rectangle shaped laundry basket. Place your baby in the center of the basket with a few pillows around the edges for support. Provide some toys for your baby to play with and make sure you are close by to monitor and offer encouragement.
-You can also use an inflatable swimming tube on your living room floor, in place of a nursing pillow. Just make certain that your baby is always supervised to avoid any possible danger.
-Here is another fun exercise you can do with your baby: Sit on the floor with your knees bent. Place your baby on your knees and hold him securely around the waist. Tilt your knees to the left and see if your baby can bring himself back to the center. Repeat by moving your knees to the right.
Taken in part from Home Visitor's Guide, Welcome Baby, p.6.12. Utah County Healthy Department, 2004.
Pets are a wonderful addition to your home and family, the provide love, entertainment, and purpose to our lives. When you are expecting a baby and you have a pet, here are some things to consider:
The first thing to do is make an appointment with your veterinarian to make sure Kitty and Rover are in tiptop health and all their vaccinations are up-to-date. While there, be sure to tell him or her that you are expecting, and ask about restrictions on what you can and cannot do with your pets while pregnant. Ask the vet for advice on preparing the pets for a new baby. Most veterinarians will be happy to offer tips that will help both Kitty and Rover adjust to the new arrival.
Remember that Rover and Kitty are members of your family. They have become accustomed to your attention and their lifestyle. The closer you can maintain the same routines for them after the baby is born, the easier the transition will be. This means that whenever possible keep up the daily walks, petting rituals, and evening snuggles. If you know that your routine is going to change after baby is born, it is best to adjust it now with your pets, before baby enters the scene.
You will need to establish some boundaries for Kitty, who may be used to going where she pleases in the house. Blowing up some balloons and placing them in areas where you want to discourage her from going can help. The squeaking and loud popping sounds the balloons make, as well as the occasional balloon clinging to her fur from static electricity, should be enough to convince her to avoid these areas at all costs. Filling the bassinet or crib with balloons and allowing Kitty to jump in will quickly teach her that she does not want to be there.
Washing Rover's blanket in the same laundry soap you plan to wash the baby's bedding and clothing with will help the adjustment beforehand. The most helpful thing for Rover would be to have dad bring home a receiving blanket from the hospital that was used by your baby. This will help Rover adjust to the new scent of baby far more quickly.
Once your new baby arrives at home, it is important to pay special attention to your pets, especially in those first few days when baby comes home. If possible, have Dad pay attention to them while you feed the baby. Then have Dad burp the baby while you take your turn paying attention to Kitty and Rover.
Don't be afraid to allow Kitty and Rover to come over and give baby a "hello sniff," while you have the baby safely cuddled in your arms. It helps them get adjusted to the source of this new scent and become more familiar with the baby's movements. Remember, even the most faithful family pet can be startled by a baby's sudden actions or cries, so it will be important for you to take the time to assure Kitty and Rover that these movements and noises are okay.
By the time your baby is on the move, your pets should be well accustomed to having a new member of the family. It will be important for you to establish boundaries by letting your baby know not to play with Rover's dinner, nor pull Kitty's tail.
With some careful planning, the bonds that will be established between Kitty, Rover, and your baby will be strong, and you will be able to sit back and watch proudly as your entire family develops and interacts well together.
*Pets have instincts just like humans do, so most likely your pet, who is a loving member of your family, is going to know that the new addition is a fragile baby. Although being cautious is never a bad thing, don't assume that your pet will misbehave, give them a chance to show you that they are capable of adjusting. Children greatly benefit from having a pet to grow up with, they will have a constant companion and friend that they will cherish throughout the rest of their lives. *
Taken in part from:
http://www.hobokenvet.com/site/view/100483_VaccinationInformation.pml,
http://www.parentingweekly.com/baby/baby_health_safety/pets_2.htm
Whether you are having an all out Halloween bash, or just want something a little extra-special to make for Halloween, these two treats will definitely be a hit with both kids and parents. We all know that there is never a shortage of sugar around Halloween which is what makes these treats so great - they're both healthy and fun!
To make the spider you will need: whole wheat Ritz crackers, pretzels, peanut butter and raisins. Break pretzel sticks in half and then cover one Ritz cracker with peanut butter. Add on 8 pretzel halves and then cover with another Ritz cracker. Add a small amount of peanut butter to the edge of the top cracker and place two raisins there for eyes. Then you have your spider treat!
This recipe was found at: http://familyfun.go.com/recipes/pretzel-spiders-675732/
Another fun treat is to make String Cheese fingers. You will need: string cheese, cream cheese and a bell pepper. Cut the string cheese in half and then use a knife to make small ridges where the knuckles would be. Cut the bell pepper into small squares to be used for the nail and apply to the string cheese with a dot of cream cheese and you're done!
This recipe was found at: http://familyfun.go.com/recipes/cheese-finger-food-685121/
You know how critical good sleep is for your child, but just how much sleep does your little one need? Keep in mind that children's sleep needs vary based on age as well as based on the individual needs of your child. Here are some basic guidelines based on age.
Birth - 6 months: Young babies need about 16-20 hours of sleep in a 24 hour period.
Nighttime sleep for babies this age is generally 10-12 hours in length.
Daytime sleep is usually 3-5 hours in length, usually split up between 2 to 3 naps.
6 - 12 Months: Nighttime sleep at this age is usually around 11 hours.
Daytime sleep often totals between 3-4 hours and is split between 2 naps.
Toddlers (1-3 Years): Toddlers need 10-13 total hours of sleep in a 24 hour period.
Toddlers usually take one nap a day, in the afternoon, ranging between 1-3 hours in length.
Preschoolers (3-5 Years): 10-12 hours of nighttime sleep and one afternoon nap, which is usually dropped by age 5.
This year, why don't you do something a little different, instead of just trick-or-treating, throw your own children a Halloween party right in comfort of your home. A few ideas that you could do would be:
Games
Instead of bobbing for large apples or dipping a whole apple in carmel, cut an apple into slices. Have a bowl with carmel, and then a couple other bowls with your kids favorite small, chewable candy. They can dip their apple slices in each one!
We all love the donuts on a string. Since your little tikes have little mouths, try using Hostess donuts on a string more at their level. Explain that they have to keep their hands behind their back and try to get the donut with their mouth. What kid wouldn't try hard to get that donut?!
Activites
Have your kids all get into their Halloween costumes. If you have more than one child, have them do a fashion show for you and any other adults in the home. If there is only one child, maybe doing a cute little photo shoot would be fun for them.
Halloween is a time of treats! So bake a batch of sugar cookies (in Halloween shapes) and supply orange, black and purple icing, along with different sprinkles.. Have each child decorate their own cookie. Make sure you take a picture with your child and their cookie. Then let them eat it! I'm sure they'll want to make more than one ;)
If your children are a bit older, you may want to help them carve a pumpkin. Before the party, take them to a pumpkin patch and let them pick out their very own! Then during your party, help them to carve their favorite character's face or their name into the pumpkin!
Provide each child with a blank sheet of paper and crayons. On a child-proof table, let them draw a pumpkin or some other kind of Halloween related picture. Praise your children on their artistic ability and hang their pictures up around the house. They will be so proud of their work and this will help them gain confidence in themselves.
Decorations
Don't worry about spending a lot of money on this event. Check out your local dollar store or drug store for affordable, festive plates, napkins, silverware, and other items you may need for the party.
Hang streamers from the ceilings or stream them around the wall, maybe have cut-out pumpkins leading from their bedrooms to where the party will be held. Get creative!!
Putting a Halloween party on for your kids is a great way for them to be creative, show off their talents, and have fun in a safe, comfortable setting.
Here is a really fun, festive craft you can do with your children! These Halloween lanterns are easy to create and make great decorations. All you need are the following items...
Some jars (Mason jars, spaghetti sauce jars...any jars will do!)
Tissue Paper
Mod Podge (available at craft stores)
Ribbon
Paint brush
Glue
Black paper
You can either start by covering your jar with Mod Podge (including the bottom of the jar) and then wrapping the tissue paper around the jar, or you can cut the tissue paper into strips and place Mod Podge and the strips on one at a time. After your tissue paper is on the jar, brush some more Mod Podge over the top of it to seal it.
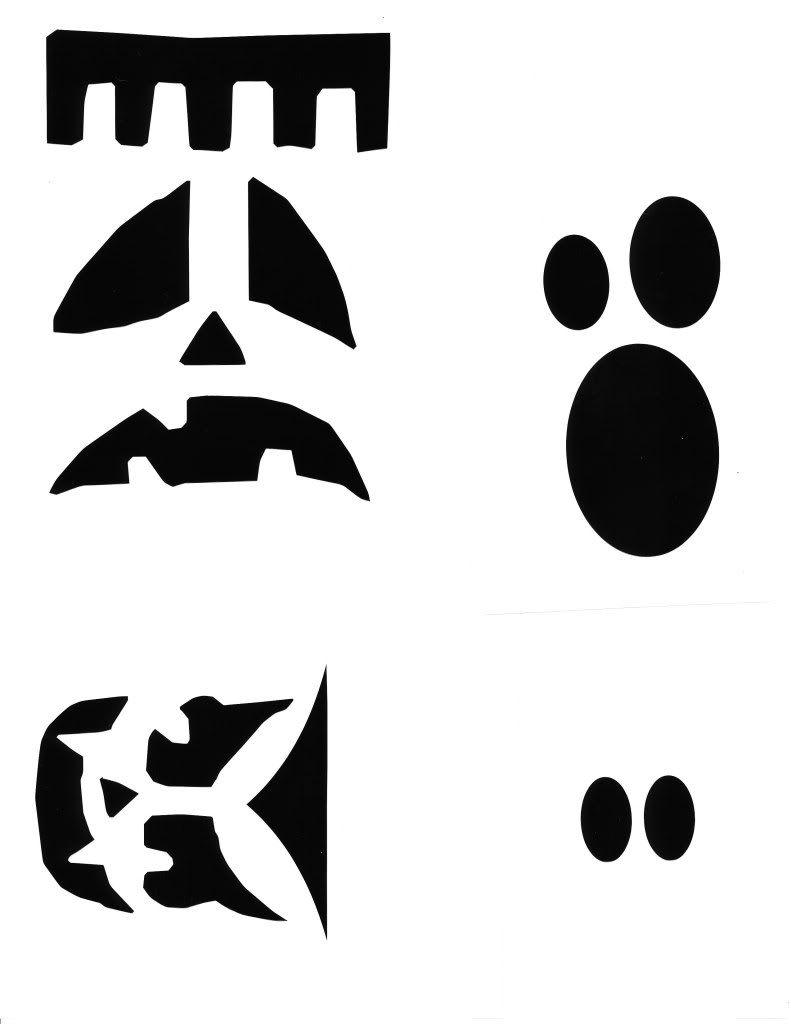
Let your jar(s) dry and cut out some fun faces out of the black paper. Once the jars are dry you can use use the glue to stick the faces on. Here is a link to some items you can use as a guideline for the faces: Monster Face Cut-Outs
You can attach a piece of ribbon to the rim of the jar, place a tea light inside and you have completed your lantern!
Happy Halloween and enjoy!
Much of this post--including the pictures--came from this website, a blog I would highly recommend:
http://www.ourbestbites.com/2009/10/crafty-in-kitchen-mason-jar-lanterns.html
When infants reach about three months old, they are becoming more active. A good toy or activity for this age group are mobiles. Here is a step-by-step to make your very own baby mobile.
Step 1: Purchase PVC pipes and have them cut at your local hardware store (i.e. Lowe's, Home Depot). This is a very inexpensive purchase; much less than buying a pre-made mobile from a toy store. The pipes need to be the following lengths:
2-16"
4- 6"
1- 18"
Step 2: Purchase the joints that will attach all the pipes together. The joints need to be the following:
2- T's
2- elbows
4- caps
Step 3: Place the caps on all four of the 6" pipes, then attach the other end of the 6" pipes into a "T" joint.
Step 4: Place the two elbow joints on one end of the 16" pipes. Connect each of the other end of the 16" pipe into the opening of the "T."
Step 5: Connect the mobile together with the last 18" pipe by placing in in each end of the elbow joints (that are connected to the 16" pipes).
Attach items to the 18" pipe of the mobile (the top) that hang down. Some examples could be a mirror, pictures of family members, bright colored cardstock, etc. This mobile will help with visual stimulation, promotes gross motor development, and play time.
So many new mothers do not fully realize the amazing benefits of breastfeeding, and that breastfeeding can benefit the mother as well as the baby!
Breastfeeding Protects Babies
Early breast milk is liquid gold – Known as liquid gold, colostrum (coh-LOSS-trum) is the thick yellow first breast milk that you make during pregnancy and just after birth. This milk is very rich in nutrients and antibodies to protect your baby. Although your baby only gets a small amount of colostrum at each feeding, it matches the amount his or her tiny stomach can hold. (Visit How to Know Your Baby is Getting Enough Milk to see just how small your newborn’s tummy is!)
Your breast milk changes as your baby grows – Colostrum changes into what is called mature milk. By the third to fifth day after birth, this mature breast milk has just the right amount of fat, sugar, water, and protein to help your baby continue to grow. It is a thinner type of milk than colostrum, but it provides all of the nutrients and antibodies your baby needs.
Breast milk is easier to digest – For most babies — especially premature babies — breast milk is easier to digest than formula. The proteins in formula are made from cow’s milk and it takes time for babies’ stomachs to adjust to digesting them.
Breast milk fights disease – The cells, hormones, and antibodies in breast milk protect babies from illness. This protection is unique; formula cannot match the chemical makeup of human breast milk. In fact, among formula-fed babies, ear infections and diarrhea are more common. Formula-fed babies also have higher risks of:
Necrotizing (nek-roh-TEYE-zing) enterocolitis (en-TUR-oh-coh-lyt-iss), a disease that affects the gastrointestinal tract in preterm infants.
Breastfeeding has also been shown to lower the risk of SIDS (sudden infant death syndrome).
Mothers Benefit From Breastfeeding
Life can be easier when you breastfeed – Breastfeeding may take a little more effort than formula feeding at first. But it can make life easier once you and your baby settle into a good routine. Plus, when you breastfeed, there are no bottles and nipples to sterilize. You do not have to buy, measure, and mix formula. And there are no bottles to warm in the middle of the night! You can satisfy your baby’s hunger right away when breastfeeding.
Breastfeeding can save money – Formula and feeding supplies can cost well over $1,500 each year, depending on how much your baby eats. Breastfed babies are also sick less often, which can lower health care costs.
Breastfeeding can feel great – Physical contact is important to newborns. It can help them feel more secure, warm, and comforted. Mothers can benefit from this closeness, as well. Breastfeeding requires a mother to take some quiet relaxed time to bond. The skin-to-skin contact can boost the mother’s oxytocin (OKS-ee-TOH-suhn) levels. Oxytocin is a hormone that helps milk flow and can calm the mother.
Breastfeeding can be good for the mother’s health, too – Breastfeeding is linked to a lower risk of these health problems in women:
Experts are still looking at the effects of breastfeeding on osteoporosis and weight loss after birth. Many studies have reported greater weight loss for breastfeeding mothers than for those who don’t. But more research is needed to understand if a strong link exists.
Mothers miss less work – Breastfeeding mothers miss fewer days from work because their infants are sick less often.
Some other ways that breastfeeding can benefit the mother are:
-Breastfeeding can burn several hundred calories a day! Depending on how often you breastfeed, you can burn up to 500 calories a day, which will help you shed those pregnancy pound easier.
- Faster return of the uterus to its pre-pregnancy state
-Reduced risk of breast, ovarian, cervical, and endometrial cancers
-Protection against osteoporosis and hip fracture later in life
…..So overall Breastfeeding will help your health greatly, as well as your babies!
Breastfeeding Benefits Society
The nation benefits overall when mothers breastfeed. Recent research shows that if 90 percent of families breastfed exclusively for 6 months, nearly 1,000 deaths among infants could be prevented. The United States would also save $13 billion per year — medical care costs are lower for fully breastfed infants than never-breastfed infants. Breastfed infants typically need fewer sick care visits, prescriptions, and hospitalizations.
Breastfeeding also contributes to a more productive workforce since mothers miss less work to care for sick infants. Employer medical costs are also lower.
Breastfeeding is also better for the environment. There is less trash and plastic waste compared to that produced by formula cans and bottle supplies.
When an emergency occurs, breastfeeding can save lives:
Breastfeeding protects babies from the risks of a contaminated water supply.
Breastfeeding can help protect against respiratory illnesses and diarrhea. These diseases can be fatal in populations displaced by disaster.
Breast milk is the right temperature for babies and helps to prevent hypothermia, when the body temperature drops too low.
Breast milk is readily available without needing other supplies.
It can be very difficult, especially now with so many families relying on two incomes, for mothers to continue breastfeeding past maternity leave. But remember that even a few weeks or months of breastfeeding are invaluable to you and your baby, and pumping is definitely something to consider. Pumping can increase your milk supply, and allow you to be away from your baby in between feedings.
Children gather information primarily through their five senses. A wonderful way to help your child learn is by providing them with opportunities for hands-on-learning. You don’t have to purchase an expensive sensory table to accomplish this. Here are some fun and inexpensive ways to expose your child to different textures and mediums.
Water Sensory: During bath time, allow your child time to play with bath toys or household items such as cups and mixing spoons. Use descriptive words to talk about the properties of water such as wet, warm, cold, slippery and so on. Play a game where you show your child an object and ask them if they think it will float or sink. Then place the object in the water and talk about the result.
You can also expose your child to water sensory experiences by allowing them to help you rinse and wash dishes, bathe the family pet and water plants or your yard.When the weather is appropriate your child can splash in puddles, play in the rain, swim in a pool or run through the sprinklers.
Play dough: Children often enjoy the squishy, moldable qualities of play dough. Provide your child with cookie cutters, rolling pins or other safe kitchen items to use.
Finger Paint: Provide your child with non-toxic finger paint and a smock or old shirt to protect their clothing. Allow them to paint paper or cardboard items such as empty cereal boxes and paper towel rolls.
Sand: You can use a shallow storage bin filled with sand as a small sand box. You can also use the lid to cover the sand and protect it from stray pets and rain. Provide a variety of cups, spoons or shovels for your child to dig and pour with.
Dirt: Plant a garden with your young child. If you don’t have the space for a garden, you can plant a potted flower or herbs.
Shaving Cream or Whipped Cream: Lay wax paper on your table and dress your child in a smock or oversized shirt. Use shaving cream only if your child
understands that it is not edible. Allow your child to squish the cream in their hands and draw pictures in it with their fingers.
Make your own sensory table: You may have seen the sensory tables provided in many preschools and daycares. Such tables are convenient, but they can be very expensive. You can provide your child with the same experience by using a much less expensive storage bin. The variety designed for use under a bed are often shallow and long, perfect for use as a sensory table. Place a waterproof table cloth or a sheet under the bin to protect your floor and provide easy cleanup. You can then fill this with any of the following items;
- Dry rice or dry beans and cups, bowls, spoons, etc.
- Scrap paper and magazines with child-safe scissors for cutting practice.
- Sand, water or any of the other items mentioned previously.
Tummy time is very important for babies so they can develop the strength that they need.
What if my baby does not seem to like being on his tummy? Even though some babies do not seem to like this position, it is important for them to have their tummy time so they can practice lifting their head. If you place your baby on his tummy a couple times a day for short periods of time, he will eventually learn to enjoy the position!
Tummy Time Central is a great website with very useful information about tummy time. Questions like, "How much tummy time is necessary?" "When should babies start?" and "What activities are best?" are all answered here.
Here are just three of the five tummy time "moves" from this website: Tummy Time Moves
Try them out!
Tummy to Tummy: Lie down on your back and place your baby on your tummy or chest so that you are face-to-face. Tummy Minute: Every time you change your baby's diaper, place him on his tummy for one to two minutes. Tummy-Down Carry: Slide one hand under the tummy and between the legs of your baby while you carry him tummy down.
Once your baby starts to become mobile, there suddenly is an urgent need to “baby-proof” all areas of the home baby can now access. One tool several mothers choose to employ in their baby-proofing efforts is a baby safety gate. These gates are especially useful if you have stairs, certain rooms or hallways you do not want baby crawling in, or if you have a fireplace. There are many different kinds of gates available to be purchased, ranging greatly in function, quality, and cost. One website to visit when you are thinking about purchasing a baby gate is http://www.babycenter.com/0_safety-gates_441.bc. Here you can find great questions to ask yourself about a gate you are considering in order to make sure it is safe and suits your needs. Here are some of the main questions to consider when purchasing a gate according to this article:
1.Was the gate made after 1985? Most gates made from this time are not available to purchase anymore, but if you are shopping secondhand, you may encounter an expandable accordion-style gate that was probably made before 1985. These gates are hazardous and dangerous for your baby, so just say no to these.
2.How far apart are the slats? If there are vertical slats incorporated into the gate, make sure the space between each one is not more than 2 3/8 inches. If the space is larger than this, it is not safe for your baby.
3.Is the gate safety-certified? The gate should have a “ASTM/JPMA” certification seal on the packaging. If it does not have this seal, than the gate is not guaranteed to comply with voluntary safety standards
Although they are more expensive than their pressure-mounted counterparts, hardware-mounted gates are safer since the pressure-mounted gates can be knocked out of their place pretty easily.
Feel free to look at that website for more guidelines for baby safety gate purchasing!
It’s that time again, when the holidays are approaching and the weather gets chillier. We all worry about that three-letter word…the FLU! In a recent article on Parenting.com (http://www.parenting.com/article/Baby/Health/On-Call-Flu-Shot-Safety), Dr. Claire McCarthy answers a parents question about their infant receiving the flu shot.
Q. My pediatrician says flu shots are safe for babies, but I've read otherwise. Would you give one to yours?
A. Absolutely. Influenza can be a serious illness, especially for infants -- which is why the American Academy of Pediatrics (AAP) and the Centers for Disease Control recommend that all children under age 2 be immunized as early as possible each flu season (roughly September to March).
Make sure this year that your baby is prepared for the cold weather. Here is a list of locations that offer the flu shot:
Intermountain North Valley Pediatrics 212 S. 1100 E., American Fork
Intermountain Highland Health Center 10968 North Alpine Highway, Highland
Deseret First Credit Union 337 N. State St., Orem
Intermountain North Canyon Family Practice 3200 North Canyon Road Suite D, Provo
Utah County Health Department 151 S University Ave #1900, Provo
Salem City Center 30 West 100 South, Salem
Intermountain Springville Health Center 762 West 400 South, Springville
"Hey diddle, diddle the cat and the fiddle the cow jumped over the moon. The little dog laughed to see such sport and the dish ran away with the spoon."
Nursery Rhymes may seem old-fashioned, but these silly songs and poems are gold mines when it comes to boosting your child’s verbal and literacy skills!
Nursery Rhymes help young children by:
- Teaching Rhyming. Rhyming plays an important part in early literacy.
- Teaching Vocabulary. Nursery Rhymes are full of words that your child may not hear during a routine day. Hearing these words in context increases your child’s vocabulary. A large vocabulary is a critical skill for successful reading comprehension.
- Assisting Phonemic Awareness (the ability to hear and separate sounds in spoken language). Listening to and reciting nursery rhymes helps young children distinguish these important components of their native language.
- Providing Literacy Fun! What better way to help your child love written and spoken language than presenting it in silly songs, fun poems and easily remembered stories.
These are just a few of the many reasons to make nursery rhymes an important part of your child's life.
You can begin good dental care for your baby before he or she is even born by eating a healthy diet and taking care of yourself during your pregnancy. Tooth buds begin forming under your baby's gums between the third and sixth month of gestation so be sure you eat a balanced diet; take your prenatal vitamins; and get enough vitamin A, C, and D; as well as protein, calcium and phosphorous.
A baby's first tooth usually erupts around 6 or 7 months of age (although this range can vary widely), but you can begin good dental care before your baby ever gives you that first toothy grin. "Baby bottle tooth decay" results when residual juice or milk pools around teeth and gums for long periods of time, such as during sleep. To prevent this, never allow your baby to fall asleep with a bottle of milk, juice, or any other sugary liquid and do not allow a toddler to carry a bottle around all day.
Before any teeth erupt, gently wipe your baby's gums twice a day using a clean, wet piece of gauze wrapped around your finger. And as soon as the first tooth breaks through, begin brushing it daily using a soft toothbrush made especially for little mouths. Toothpaste isn't recommended until your child is a little older (2 to 3 years old); and once you begin to use toothpaste, use only a small amount - about the size of a match head - and teach your child not to swallow it. Once two teeth come in next to each other, begin flossing every day.
You should take your child to a pediatric dentist (a dentist that specializes in children's dentistry) around his or her first birthday, or about six months after the first tooth erupts, and twice a year thereafter.
According to the Centers for Disease Control, approximately 67.3 percent of the U.S. population on public water supplies has access to fluoridated water. Fluoride is a naturally occurring mineral that helps strengthen the tooth's enamel (outer coating) and recent studies show that water fluoridation reduces tooth decay in permanent teeth by approximately 18 to 40 percent. If your area does not have fluoridated water, ask your child's pediatrician or dentist about fluoride supplements.
Beginning good dental care early will ensure your child develops a mouth full of healthy teeth and an adorable smile.
Brushing your baby's teeth may not seem important because baby teeth eventually fall out. But poor dental care during the first years of life can lead to permanent tooth damage later on.
If you are looking for a fun, free, educational activity to enjoy with your infant, toddler or young child, try Story Time at the Provo City Library. Click HERE for a schedule of events!
"Last Friday I attended "Book Babies" with my 4-month old. He squealed with delight as we sang songs and read stories. He loved seeing the other babies and I had fun talking to other mothers!"
Making your own baby food can sound a bit overwhelming, especially for first time parents who already have their hands full. Luckily, with a few directions, you can easily make healthy, delicious food for your infant. Pound per pound, home-made baby food is about half the cost of store bought baby food. Fresh baby food is also free of additives such as preservatives.
Following is a step-by-step guide to making delicious yellow squash baby food.
Butternut squash can be fed to infants ages 4 months and up.
Step 1: Select as many ripe squash as you would like to prepare. Wash the skins.
Preheat your oven to 400 degrees Farenheit.
Step 2: Cut squash in half and scoop out the seeds.
Step 3: Place squash inside-down in a pan with 1 inch of water.
Periodically check the water level during baking.
Add more water as needed.
Step 4: Bake squash for 30-40 minutes, or until the skins pucker and insides are soft.
Step 5: Scoop out the squash insides/pulp.
Step 6: Place the squash pulp in a blender or food processer. Add water (you can use the water the squash was cooked in if you strain it to remove any seeds or skins) to achieve a smooth consistency.
Step 7: Feed the sqaush to your baby or store it for later use. A great way to store baby food is to freeze it in ice cube trays. When the food has solidified, you can place the cubes in a zip lock bag. Simply thaw the pieces and serve them at a later time.


