-->

Wednesday, October 31, 2012

Happy Halloween!


In the spirit of Halloween we decided to have a party at Playgroup!  The kids got to dress up in their favorite costumes and play with some of the different hats we brought.  For this special playgroup we read It’s Pumpkin day Mouse! by Laura Numeroff and Felicia Bond.  This adorable book can help the kids count the different pumpkins and see the various faces mouse can paint. 

Our Halloween craft was taken from the 5 Little Pumpkins song.  Each of the kids were able to make their own patch of pumpkins and take a copy of the song home to play with. 

5 Little Pumpkins Song:

5 little pumpkins sitting on a fence.
The first one said, "Oh my, it's getting late!"
The second one said, "There are witches in the air!"
The third one said, "Well we don't care!"
The fourth one said, "Let's run and run and run!"
The fifth one said, "I'm ready for some fun!"
Whoo-ooo went the wind
And out went the light
And the five little pumpkins rolled out of sight!


The kids spend most of the time playing around in the sensory Bin.  Here’s how you can make one yourself, it’s easy!

Fill a large container with black beans and corn to get that spooky Black and Orange look.  Then fill it with all kinds of Halloween toys.  We filled our bin with spiders, skeletons, pumpkins, monster fingers, skulls, snakes and spiders.  The kids loved running their hands through the corn and beans, they also loved the sound it made when they’d drop the beans back into the bin.  Try making your own at home and put in some small toys for them to hunt for.  Just make sure to lay down a table cloth or towel under the bin for easy clean up in case the beans fall out.


What Halloween party wouldn’t be complete without some snacks?  We had mini pumpkin muffins with chocolate chips for the kids.  You can make regular sized muffins, but the kids loved the mini ones the best. Here’s an easy recipe you can use to make your own.

Chocolate Chip Pumpkin Muffins

Ingredients:
1 Package yellow cake mix
1 (15oz) can pumpkin puree
1 teaspoon ground cinnamon
½ teaspoon ground nutmeg
¼ teaspoon ground cloves
1 ½ cups chocolate chips

Directions:
1. Preheat oven to 350 Degrees F
2. Grease muffin tins
3. In a large bowl combine the cake mix, pumpkin, cinnamon, nutmeg and cloves until smooth. 
4. Stir in chocolate chips
5. Bake 20-25 mins

Tuesday, October 30, 2012

Scarf Fun, Baby Biking, and Fish Books

 Scarf Fun
Target age:
Early infant
Picture
Materials you will need:
Scarf

What to do: 
Find a colorful silk scarf (or handkerchief). Lay your child on a soft blanket. Move the scarf over your child's head. Observe how your child follows the scarf.

Skills learned:
Visual tracking
Tactile stimulation

Information taken from: http://www.productiveparenting.com/aspx/Activities.aspx?aid=80


Baby Biking
Target age:
Middle infant
Picture
Materials you will need:
Blanket

What to do:
Baby biking builds body awareness and motor skills, while preparing your child to crawl. Lay your infant down on a blanket, facing up. Holding your infant's feet, gently move the legs in a bicycling motion, using encouraging words.

Variations:
Try moving your baby's hands and play Baby Boxing.

Skills learned:
Coordination
Lower body strength
Tactile stimulation

Information taken from: http://www.productiveparenting.com/aspx/Activities.aspx?aid=2242


Fish Book
Target age:
Late infant
Picture
Materials you will need:
Photo album

What to do:
Children love books made especially for them! Making a "Fish Book" may be an interesting activity for you and your child today. Download pictures of different kinds of fish and place them in an album. Start with 4 fish. Put each picture on the left side of the album and the name on the right side. Keep adding to the book as your child observes fish when you go to the aquarium, zoo, or the beach.

Variations:
Take digital photos of different kinds of fish on your next visit to the zoo or aquarium.

Skills learned:
Language development
Vocabulary enrichment
Classifying
Visual stimulation

Information taken from: http://www.productiveparenting.com/aspx/Activities.aspx?aid=371

Monday, October 29, 2012

Transitioning Your Baby to Table Foods - Part 2

There is a lot to say on this topic, so it's been broken down into two different posts. You can access part 1 of this article here.

After your baby has had some practice eating, try giving them so crunch but meltable foods (such as puffs or Townhouse crackers) with every meal. Encourage your baby to eat these foods on her own, but feel free to provide assistance when necessary. If they are managing these foods well, move them on to softer foods that require more chewing. You can tell when your baby is handling these foods well when there is little or no coughing, choking, or gagging, and they can swallow easily (no hard gulps). This should go on consistently for at least a week or two.
Picture
Some examples of softer foods to move on with (in increasing order of difficulty) are avocado, bananas, scrambled eggs, boiled potatoes, muffins, pasta, deli meat, and cheese.

At this point, you can also try pairing crackers and other crunchy foods with various spreads (jelly, hummus, cream cheese, etc.) in order provide your child with more exposure to different textures and types of table food. Spread it right on the cracker in front of them or show them how to dip it into a glob on their tray. Start giving them these foods first at a meal and let them eat as much as they want to. If you feel like they haven't eaten enough, you can supplement the table food with some baby food. Slowly keep presenting more table foods and offering less baby food. Eventually, they will eat enough of the table food that you no longer need to supplement it with baby food. Once you reach this point, it is okay to dip back into baby foods for an occasional meal, but you need to make the leap into letting go of the security that baby food offers. Keep trying lots of different table foods.
Picture
As they eat softer foods and spreads well, you can begin to (slowly) experiment with mixed textures, like soups and casseroles. Again, keep this slow. Start off with something like mac and cheese, then move on to spaghetti and meatballs, and then to chicken noodle soup. They progressively have more changes in consistency within a bite of food. You can give your baby a couple pieces of these foods on his tray, but you will probably be feeding him mostly by spoon.

Helpful Tips:

  • The best way to present most of these foods is in a small cube shape. This gives your baby more control and lets her pick up her food and control the size of bites she is eating. It is normal for babies to choke some when learning to eat more solid foods, but we can minimize the risk by giving them smaller pieces until they are ready to handle larger ones.
  • Puffs have almost no calories. They are great for when you start on table foods, but they don't offer enough to fill their little tummies when you pull further way from baby food.
  • Do not forget -- this is a transition. Moving your child to table foods is a process, and often a challenging one. It will often mean taking a few steps forward and then one step back, and will most likely be very time-consuming. Don't expect your baby to grasp the concept overnight.
  • Be careful of foods that present a greater choking hazard than normal. These include hot dogs, grapes, marshmallows, large dollops of nut butters (like peanut butter), nuts, lettuce, popcorn, and hard candies. Hot dogs, grapes, and marshmallows can all be cut into smaller pieces. Spread nut butters thinly on foods. Anything larger than a pea can get lodged in your baby's airway.

If You Are Having Difficult Making This Transition
Some children have a harder time moving on to table foods. They may have been pros at baby food but turn their noses up at table foods and refuse many (or all!) of them. This is often related to sensory defensiveness and/or difficulty chewing. If sensory defensiveness is the issue, allow them to play with their food. Encourage it. This will help break this reticence down. Take the pressure off of eating and make a game out of those bananas that they refuse to eat or even touch.
Picture
Finally, remember that your baby watches you closely and will want to imitate what you do. Show her how to chew by leaving your mouth open and letting her see. Be positive about the foods she tries, even if she refuses them or spits them out. Keep presenting it over and over, at least 12 times. We all have food preferences, but even for adults, it takes at least 10 to 12 times to know if we truly do or do not like a food!

If you continue to struggle with moving forward with this transition, beyond a reasonable degree, consider consulting an expert.

Wednesday, October 24, 2012

No Dragons for Tea


This time our playgroup was all about fire safety.  To help teach this we read a book about a dragon that accidentally catches the house on fire when he sneezes during Tea Time.  The family had to get out of the house fast and call the fire department to put out the blaze.  this is a great book for some of the older kids, but may be a bit long for the little ones.

We asked the kids what they would do if there was a fire.  Many of the kids wanted to hide or run back into the house if their favorite toy was still inside.  When faced with a similar situation, most kids may want to do the same, but this can be dangerous!  

Many of the parents didn't have a meeting place for their family if there was a house fire or any other emergency.  Take some time to talk with your child about what they should do if there was a fire in your home and do a practice drill.  The things you teach your kids now will really help them in case of an emergency. 

To help the kids remember the story we made some of our own dragons that breathed paper fire.  This was a great craft for our theme if you're interested in some fun ways to teach about fire safety, but can be used anytime you want to have some fun!  Here’s how you can make your own:

What you’ll need:

     Disposable cup
     Scissors or small pocket knife
     Popsicle stick
     Craft eyes
     Red party streamers
·    Stuff to decorate with


1 - Take the disposable cup and cut a hole in the bottom.  That way you can blow through one end and make the fire come out the other.

2 - Make a small cut on the side of the cup and insert the popsicle stick as a handle.

3 - Glue on the eyes and decorate the dragon with markers, glitter, dots, stickers, or anything you have around the house.  We used colored polka dots at our playgroup. 

4 - Tape strips of red party streamers to the inside of the cup.  You can also use red ribbon, but light weigh paper works the best.


Tuesday, October 23, 2012

Mess-Free Finger Painting

Children love finger painting and parents hate it, usually for the same reason -- the mess! However, this easy activity allows your child to have the fun and the feeling of playing with the paint without you having to deal with the huge mess afterwards. It's a win-win solution for everybody.
Picture

Things You Will Need:
Painters tape or masking tape
Heavy paper
Ziploc freezer bags
Paint (or similar colored substances such as hair gel or shampoo)

Squirt the paint into plastic bags. You can use just one color or try squirting in two primary colors of something like tempera paint, and turn it into a great color-mixing experiment for your child as well. From here, there are two ways you can proceed -- one is slightly messy (for you) and the other is completely mess-free.
Caption
First, you can place the paper in the bag and then tape the whole thing down to the table with the masking or painters tape. Make sure you push out all of the air bubbles before the kids start smearing the paint around. Then, let your kids have at it. The messy part will come when they've finished painting and you need to take the paper out. Or you can just throw the whole thing away.
Caption

The second option is to place the paper on the table (outside of the bag) and then tape the closed bag over the top of the paper. If you choose to do it this way, the bags (and the paper) can be reused for as long as the bag will hold up.
Caption

And on days where you're in a particularly good mood, good old-fashioned regular finger-painting is always an entertaining and popular way to pass the afternoon.


Information taken from:
http://hippiehousewife.blogspot.com/2012/01/mess-free-finger-painting.html
http://mamasmiles.com/learning-laboratory-mess-free-art-improved/

Monday, October 22, 2012

Transitioning Your Baby To Table Foods - Part 1

Many parents who have older infants are concerned about getting their child to shift from baby foods to solid foods, while others are frustrated because they have toddlers who are still stuck on baby food. Making the shift from the soft baby foods to the more solid table foods can be a big step for your child and one they may not want to take. There are several things you can do to make the process at least a little easier, for you and for your child.

Getting Ready
A week or two before you plan on introducing solids, start thickening your child's baby food. If you are making your own baby food, you can do this by adding less water or liquid when pureeing. If you are using the jarred baby foods, make sure you are on stage 2 foods. Some stage 3 foods are also good, as long as they don't have a mixed texture (whole pieces of food mixed in with the puree). Don't go there -- yet. You can also increase thickness by adding cereal to baby food or adding freshly pureed baby food to the jarred variety.
Picture
Thickening your baby's food is important because it requires more movement of the tongue and mouth, which is great preparation for introducing solid foods. Also, make sure you begin dramatically and deliberately chewing your food in front of your child; make sure she can see exactly what you are doing. This allows her to see you modeling the kind of behaviors you will expect when you give her the first piece of solid food. It will also help you to pique her interest.

When to Start
In general, most babies are ready to start on solid foods around the age of eight or nine months. However, it may be later for your baby, especially if they were premature. You will know if your baby isn't quite ready yet if he refuses, gags, chokes, or coughs a lot when you try to give him solid foods. This is nothing to worry about. Just hold off for a little longer on the solid foods and try again later. Just take things a little slower and consistently offer them safe foods that they won't choke on.

Some babies may be ready sooner, though it is not recommended. Of course, it is always your choice and you will know when your baby is ready or not.

What the First Food Should Be
One of the best foods to introduce to your child first is something like Gerber Puffs. They aren't necessarily for the nutritional value, but for teaching your child how to handle a piece of solid food in his mouth. They work well because they are hard and crunchy at first, allowing your baby to realize that he has a piece of food in his mouth and to be able to keep track of it. However, they will dissolve very quickly in saliva, so if your baby doesn't chew and just tries to swallow it, you know that he won't choke. They can be easily handled by the baby himself and can be broken up into smaller pieces if you are still feeling nervous.
Picture
Stick with these for a few days or weeks (depending on how quickly your child responds), until you see her starting to work her jaw up and down and munch on them. Ideally, she should be feeding them to herself, but don't let that be a deal-breaker in terms of moving forward.

Many parents think that it's better to start infants off with something soft, like eggs or bananas, but this deprives your child of the opportunity to learn to chew. Because these foods are so soft, babies have a hard time figuring out where exactly they are inside their mouths and will usually just swallow them.

Once they get the hang of the puffs, try introducing other solid foods that dissolve quickly: Townhouse crackers (not Ritz), graham crackers, cheese puffs, and Baby Mum Mums. As your baby is able to handle these foods well, you can introduce other soft foods, such as bananas, noodles, cheese, breads, and over-cooked veggies cut into cubes.
Picture
Other Tips

  • Once you begin introducing table foods, offer one per meal. Then slowly increase the variety of foods until they are managing more foods. 
  • Continue to steadily increase the thickness of the baby food as you progress. 
  • Carefully monitor all new foods. Some coughing and the occasional gag is normal. However, if you are seeing this frequently, you may be trying to give them a texture that is too difficult. Wait a week or so before trying to introduce it again, and then proceed slowly
  • Discuss persistent gagging and choking with your child's doctor.


Information taken from: http://www.yourkidstable.com/2012/09/how-to-transition-your-baby-or-toddler.html

Friday, October 19, 2012

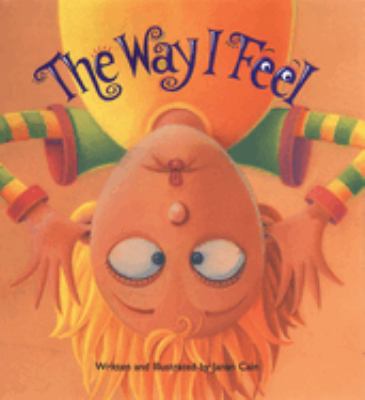
Book Review: The Way I Feel

In this fun little book about emotions, written and illustrated by Janan Cain, she utilizes different fonts and color palettes brilliantly to talk about the many different emotions that children feel every single day. From silly to angry to shy to frustrated, this book helps your child to understand what different emotions are and provides him or her with the language to describe those emotions. It also offers suggestions for how to talk with your child about what makes them feel each of the different emotions, how to correctly deal with those emotions, what your child can do to change circumstances that make them feel a way that he or she doesn't like, and practice naming and identifying their own feelings.
Picture
Activity: Use art to help your children express their emotions. After reading the book, have your children use colors and lines to show what emotions they are feeling. Talk about the difference between jagged and wavy lines. What emotions might those lines represent? Have your child try drawing soft and hard and discuss what light and dark colors might represent. Later if your child is misbehaving or struggling to identify their emotions, let them try drawing or pointing to how they feel.

Monday, October 15, 2012

5 Tips for Making Potty Training Easier

Potty training can be a daunting and difficult task for parents, especially new ones. Here are five things you can do to help your baby learn faster and make it easier on both you and your child.

Picture
  1. Acknowledge when baby is having a bowel movement and associate a word or phrase with it. This helps your child to:
    • help him know what you mean
    • keep him aware of the situation (instead of just learning to ignore it)
    • keep it a social event between you and him (instead of him going off to hide)
    • helps to prevent the stigma parents accidentally associate with bowel movements
  2. Let your active and mobile baby watch you go to the bathroom. This is helpful later because:
    • reinforces what the words for bowel movements and urination actually mean
    • reinforces the concept of toileting as a social event (prevents "stage fright" that many kids feel)
    • it creates a concept and definition of normal from the outset
    • babies love to mimic
  3. Buy a small potty and keep it around long before you actually plan on using it
  4. Picture
    • no fear of newness later on
    • they have already gotten past the stage of exploring it and looking at it before it becomes an obstacle to potty training
  5. Have your child sit on the potty sometimes while she goes, even if her diaper is still on. This helps to:
    • prevent your child from getting used to or comfortable with sitting around in a messy diaper
    • establish the correct place to have a bowel movement
    • getting them used to and comfortable with having a bowel movement in a sitting position
    • get them accustomed to the feeling of pooping without a diaper
  6. Let your baby go diaper-free every now and again. Later on, this will help to:
  7. Picture
    • prevent your child from losing an awareness of their own urination
    • make them more comfortable with being naked... not as a modesty issue, but as a sensory issue; if they always have a diaper on, the sensation of cold, hard, plastic surface on their naked bottom can be very uncomfortable
"Toileting and elimination awareness, exposure, and habit forming can and should be established very early in life, rather than ignoring it for a lifetime and then simply introducing all of the concepts at an “event”, expecting your child to take the transformation in stride."

    Friday, October 12, 2012

    Book Review: What's Up, Duck?

    In this delightful board book by Tad Hills, Duck  and Goose learn about basic opposites. Goose is clean as a  whistle, but Duck is dirty from playing the mud. While everyone else is sound asleep, Goose is wide awake. "With a simple text and colorful illustrations–plus the inimitable characters, of course–here’s a wonderful, and humorous, introduction to an important concept." This book helps to teach your child cognitive and reasoning skills that are important in all areas of development.
    Picture
    Activity: Board books are great for a child to begin reading! With the animal illustrations, you can help your child learn the concept of 'opposites'. When reading the book, make sure to emphasize the actions so your child understands what the words and actions mean. Try listing a word and see if your child can name its opposite. "Up, ____", "Hot, ____". This will greatly increase your child's vocabulary.

    Wednesday, October 10, 2012

    Here Fishy Fishy!


    Our Playgroup this week was all about fish, and to celebrate we even brought some live goldfish to play with!  

     During the playgroup we talked about clean water.  Just as our fish needed special water to live in, we need clean water to drink.  We can’t go around drinking water from puddles or rivers or we’d get sick from all kinds of germs!  I explained that when I got the fish I had to leave the water out and put some chemical in it so it would be safe for the fish.  This was a great way to teach kids about the water we drink and how we need to drink clean water.  We then made our own aquariums and had a fun snack!

    Make Your Own Aquarium!

    What you’ll need:
    ·         Paper
    ·         Crayons
    ·         Glue
    ·         Fish Cutouts

    First, make an empty fish bowl on a piece of paper.  You can find one off the internet (like we did) or draw a bowl yourself.  Color the sand at the bottom and the water as a background.  Next glue some fish cutouts onto the page.  You can draw on the fish to give them a design, eyes, or make bubbles coming out of the mouths!  Most of the kids wanted to put as many fish as they could in their bowl, but had to decide which fish to use so that everything fit.  It was a great way for the kids to practice organizing! 


    Fish Tank Snack!

    -   What you’ll need:
    ·         -        Package of Blue Jello
    ·         -   Swedish fish or gummy sharks
    ·        -    Plastic cups or bowls

    Prepare the jello as directed and pour into cups.  We used small cups to make it easier to pass out to the kids.  Then put in the fish and let it sit for a couple hours.  Place the fish completely underwater, have the fish poking its head out, or lay the fish on top if you want!  You can also pour all your jello into a glass bowl for parties or as a fun centerpiece to make it look like a small edible aquarium.  The kids loved it!